English · 2017-09-07 · 4240 002 00157 Bahasa Melayu 1 Gambaran keseluruhan (Rajah 1) Unit utama...
2
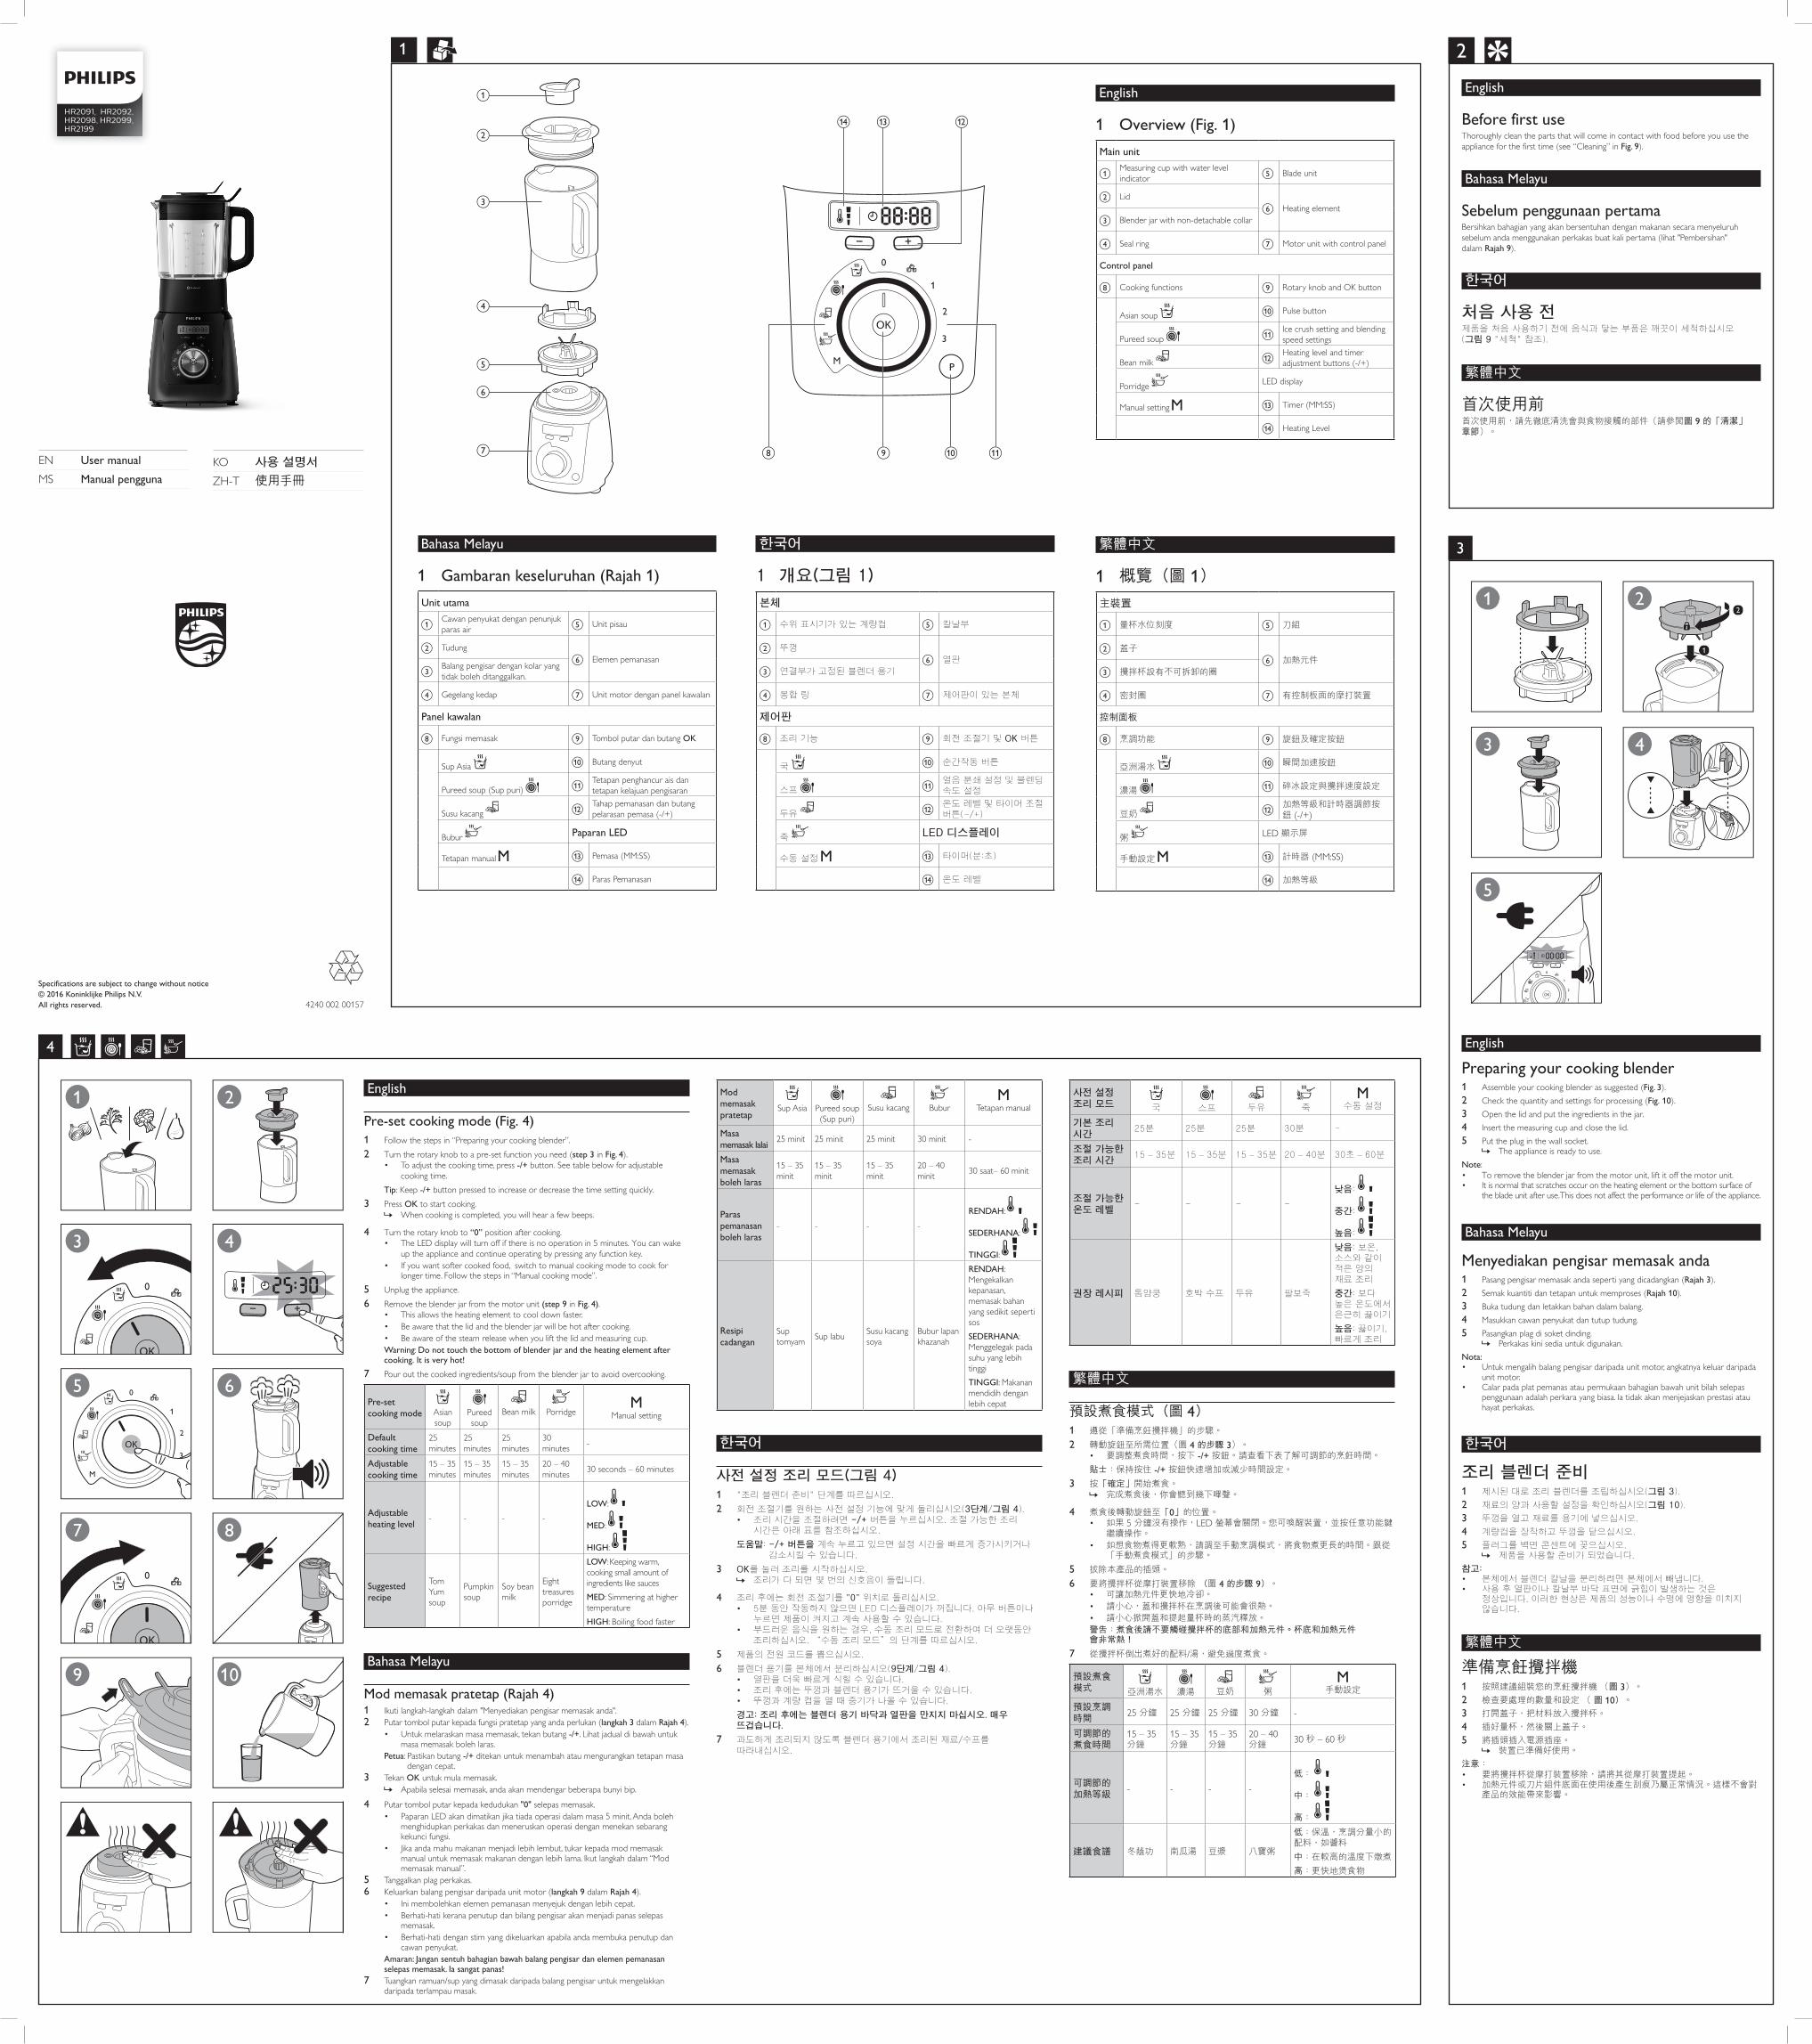
4240 002 00157 Bahasa Melayu 1 Gambaran keseluruhan (Rajah 1) Unit utama a Cawan penyukat dengan penunjuk paras air e Unit pisau b Tudung f Elemen pemanasan c Balang pengisar dengan kolar yang tidak boleh ditanggalkan. d Gegelang kedap g Unit motor dengan panel kawalan Panel kawalan h Fungsi memasak i Tombol putar dan butang OK Sup Asia j Butang denyut Pureed soup (Sup puri) k Tetapan penghancur ais dan tetapan kelajuan pengisaran Susu kacang l Tahap pemanasan dan butang pelarasan pemasa (-/+) Bubur Paparan LED Tetapan manual m Pemasa (MM:SS) n Paras Pemanasan 한국어 1 개요(그림 1) 본체 a 수위 표시기가 있는 계량컵 e 칼날부 b 뚜껑 f 열판 c 연결부가 고정된 블렌더 용기 d 봉합 링 g 제어판이 있는 본체 제어판 h 조리 기능 i 회전 조절기 및 OK 버튼 국 j 순간작동 버튼 스프 k 얼음 분쇄 설정 및 블렌딩 속도 설정 두유 l 온도 레벨 및 타이머 조절 버튼(-/+) 죽 LED 디스플레이 수동 설정 m 타이머(분:초) n 온도 레벨 繁體中文 1 概覽(圖 1) 主裝置 a 量杯水位刻度 e 刀組 b 蓋子 f 加熱元件 c 攪拌杯設有不可拆卸的圈 d 密封圈 g 有控制板面的摩打裝置 控制面板 h 烹調功能 i 旋鈕及確定按鈕 亞洲湯水 j 瞬間加速按鈕 濃湯 k 碎冰設定與攪拌速度設定 豆奶 l 加熱等級和計時器調節按 鈕 (-/+) 粥 LED 顯示屏 手動設定 m 計時器 (MM:SS) n 加熱等級 English 1 Overview (Fig. 1) Main unit a Measuring cup with water level indicator e Blade unit b Lid f Heating element c Blender jar with non-detachable collar d Seal ring g Motor unit with control panel Control panel h Cooking functions i Rotary knob and OK button Asian soup j Pulse button Pureed soup k Ice crush setting and blending speed settings Bean milk l Heating level and timer adjustment buttons (-/+) Porridge LED display Manual setting m Timer (MM:SS) n Heating Level English Before first use Thoroughly clean the parts that will come in contact with food before you use the appliance for the first time (see “Cleaning” in Fig. 9). Bahasa Melayu Sebelum penggunaan pertama Bersihkan bahagian yang akan bersentuhan dengan makanan secara menyeluruh sebelum anda menggunakan perkakas buat kali pertama (lihat "Pembersihan" dalam Rajah 9). 한국어 처음 사용 전 제품을 처음 사용하기 전에 음식과 닿는 부품은 깨끗이 세척하십시오 (그림 9 "세척" 참조). 繁體中文 首次使用前 首次使用前,請先徹底清洗會與食物接觸的部件(請參閱圖 9 的「清潔」 章節)。 English Pre-set cooking mode (Fig. 4) 1 Follow the steps in “Preparing your cooking blender”. 2 Turn the rotary knob to a pre-set function you need (step 3 in Fig. 4). • To adjust the cooking time, press -/+ button. See table below for adjustable cooking time. Tip: Keep -/+ button pressed to increase or decrease the time setting quickly. 3 Press OK to start cooking. » When cooking is completed, you will hear a few beeps. 4 Turn the rotary knob to “0” position after cooking. • The LED display will turn off if there is no operation in 5 minutes. You can wake up the appliance and continue operating by pressing any function key. • If you want softer cooked food, switch to manual cooking mode to cook for longer time. Follow the steps in “Manual cooking mode”. 5 Unplug the appliance. 6 Remove the blender jar from the motor unit (step 9 in Fig. 4). • This allows the heating element to cool down faster. • Be aware that the lid and the blender jar will be hot after cooking. • Be aware of the steam release when you lift the lid and measuring cup. Warning: Do not touch the bottom of blender jar and the heating element after cooking. It is very hot! 7 Pour out the cooked ingredients/soup from the blender jar to avoid overcooking. Pre-set cooking mode Asian soup Pureed soup Bean milk Porridge Manual setting Default cooking time 25 minutes 25 minutes 25 minutes 30 minutes - Adjustable cooking time 15 – 35 minutes 15 – 35 minutes 15 – 35 minutes 20 – 40 minutes 30 seconds – 60 minutes Adjustable heating level - - - - LOW: MED: HIGH: Suggested recipe Tom Yum soup Pumpkin soup Soy bean milk Eight treasures porridge LOW: Keeping warm, cooking small amount of ingredients like sauces MED: Simmering at higher temperature HIGH: Boiling food faster Bahasa Melayu Mod memasak pratetap (Rajah 4) 1 Ikuti langkah-langkah dalam "Menyediakan pengisar memasak anda". 2 Putar tombol putar kepada fungsi pratetap yang anda perlukan (langkah 3 dalam Rajah 4). • Untuk melaraskan masa memasak, tekan butang -/+. Lihat jadual di bawah untuk masa memasak boleh laras. Petua: Pastikan butang -/+ ditekan untuk menambah atau mengurangkan tetapan masa dengan cepat. 3 Tekan OK untuk mula memasak. » Apabila selesai memasak, anda akan mendengar beberapa bunyi bip. 4 Putar tombol putar kepada kedudukan "0" selepas memasak. • Paparan LED akan dimatikan jika tiada operasi dalam masa 5 minit. Anda boleh menghidupkan perkakas dan meneruskan operasi dengan menekan sebarang kekunci fungsi. • Jika anda mahu makanan menjadi lebih lembut, tukar kepada mod memasak manual untuk memasak makanan dengan lebih lama. Ikut langkah dalam “Mod memasak manual”. 5 Tanggalkan plag perkakas. 6 Keluarkan balang pengisar daripada unit motor (langkah 9 dalam Rajah 4). • Ini membolehkan elemen pemanasan menyejuk dengan lebih cepat. • Berhati-hati kerana penutup dan bilang pengisar akan menjadi panas selepas memasak. • Berhati-hati dengan stim yang dikeluarkan apabila anda membuka penutup dan cawan penyukat. Amaran: Jangan sentuh bahagian bawah balang pengisar dan elemen pemanasan selepas memasak. Ia sangat panas! 7 Tuangkan ramuan/sup yang dimasak daripada balang pengisar untuk mengelakkan daripada terlampau masak. 2 English Preparing your cooking blender 1 Assemble your cooking blender as suggested (Fig. 3). 2 Check the quantity and settings for processing (Fig. 10). 3 Open the lid and put the ingredients in the jar. 4 Insert the measuring cup and close the lid. 5 Put the plug in the wall socket. » The appliance is ready to use. Note: • To remove the blender jar from the motor unit, lift it off the motor unit. • It is normal that scratches occur on the heating element or the bottom surface of the blade unit after use.This does not affect the performance or life of the appliance. Bahasa Melayu Menyediakan pengisar memasak anda 1 Pasang pengisar memasak anda seperti yang dicadangkan (Rajah 3). 2 Semak kuantiti dan tetapan untuk memproses (Rajah 10). 3 Buka tudung dan letakkan bahan dalam balang. 4 Masukkan cawan penyukat dan tutup tudung. 5 Pasangkan plag di soket dinding. » Perkakas kini sedia untuk digunakan. Nota: • Untuk mengalih balang pengisar daripada unit motor, angkatnya keluar daripada unit motor. • Calar pada plat pemanas atau permukaan bahagian bawah unit bilah selepas penggunaan adalah perkara yang biasa. Ia tidak akan menjejaskan prestasi atau hayat perkakas. 한국어 조리 블렌더 준비 1 제시된 대로 조리 블렌더를 조립하십시오(그림 3). 2 재료의 양과 사용할 설정을 확인하십시오(그림 10). 3 뚜껑을 열고 재료를 용기에 넣으십시오. 4 계량컵을 장착하고 뚜껑을 닫으십시오. 5 플러그를 벽면 콘센트에 꽂으십시오. » 제품을 사용할 준비가 되었습니다. 참고: • 본체에서 블렌더 칼날을 분리하려면 본체에서 빼냅니다. • 사용 후 열판이나 칼날부 바닥 표면에 긁힘이 발생하는 것은 정상입니다. 이러한 현상은 제품의 성능이나 수명에 영향을 미치지 않습니다. 繁體中文 準備烹飪攪拌機 1 按照建議組裝您的烹飪攪拌機 (圖 3)。 2 檢查要處理的數量和設定 ( 圖 10)。 3 打開蓋子,把材料放入攪拌杯。 4 插好量杯,然後關上蓋子。 5 將插頭插入電源插座。 » 裝置已準備好使用。 注意: • 要將攪拌杯從摩打裝置移除,請將其從摩打裝置提起。 • 加熱元件或刀片組件底面在使用後產生刮痕乃屬正常情況。這樣不會對 產品的效能帶來影響。 Mod memasak pratetap Sup Asia Pureed soup (Sup puri) Susu kacang Bubur Tetapan manual Masa memasak lalai 25 minit 25 minit 25 minit 30 minit - Masa memasak boleh laras 15 – 35 minit 15 – 35 minit 15 – 35 minit 20 – 40 minit 30 saat– 60 minit Paras pemanasan boleh laras - - - - RENDAH: SEDERHANA: TINGGI: Resipi cadangan Sup tomyam Sup labu Susu kacang soya Bubur lapan khazanah RENDAH: Mengekalkan kepanasan, memasak bahan yang sedikit seperti sos SEDERHANA: Menggelegak pada suhu yang lebih tinggi TINGGI: Makanan mendidih dengan lebih cepat 한국어 사전 설정 조리 모드(그림 4) 1 "조리 블렌더 준비" 단계를 따르십시오. 2 회전 조절기를 원하는 사전 설정 기능에 맞게 돌리십시오(3단계/그림 4). • 조리 시간을 조절하려면 -/+ 버튼을 누르십시오. 조절 가능한 조리 시간은 아래 표를 참조하십시오. 도움말: -/+ 버튼을 계속 누르고 있으면 설정 시간을 빠르게 증가시키거나 감소시킬 수 있습니다. 3 OK를 눌러 조리를 시작하십시오. » 조리가 다 되면 몇 번의 신호음이 들립니다. 4 조리 후에는 회전 조절기를 "0" 위치로 돌리십시오. • 5분 동안 작동하지 않으면 LED 디스플레이가 꺼집니다. 아무 버튼이나 누르면 제품이 켜지고 계속 사용할 수 있습니다. • 부드러운 음식을 원하는 경우, 수동 조리 모드로 전환하여 더 오랫동안 조리하십시오. “수동 조리 모드”의 단계를 따르십시오. 5 제품의 전원 코드를 뽑으십시오. 6 블렌더 용기를 본체에서 분리하십시오(9단계/그림 4). • 열판을 더욱 빠르게 식힐 수 있습니다. • 조리 후에는 뚜껑과 블렌더 용기가 뜨거울 수 있습니다. • 뚜껑과 계량 컵을 열 때 증기가 나올 수 있습니다. 경고: 조리 후에는 블렌더 용기 바닥과 열판을 만지지 마십시오. 매우 뜨겁습니다. 7 과도하게 조리되지 않도록 블렌더 용기에서 조리된 재료/수프를 따라내십시오. 사전 설정 조리 모드 국 스프 두유 죽 수동 설정 기본 조리 시간 25분 25분 25분 30분 - 조절 가능한 조리 시간 15 – 35분 15 – 35분 15 – 35분 20 – 40분 30초 – 60분 조절 가능한 온도 레벨 - - - - 낮음: 중간: 높음: 권장 레시피 톰얌쿵 호박 수프 두유 팔보죽 낮음: 보온, 소스와 같이 적은 양의 재료 조리 중간: 보다 높은 온도에서 은근히 끓이기 높음: 끓이기, 빠르게 조리 繁體中文 預設煮食模式(圖 4) 1 遵從「準備烹飪攪拌機」的步驟。 2 轉動旋鈕至所需位置(圖 4 的步驟 3)。 • 要調整煮食時間,按下 -/+ 按鈕。請查看下表了解可調節的烹飪時間。 貼士:保持按住 -/+ 按鈕快速增加或減少時間設定。 3 按「確定」開始煮食。 » 完成煮食後,你會聽到幾下嗶聲。 4 煮食後轉動旋鈕至「0」的位置。 • 如果 5 分鐘沒有操作,LED 螢幕會關閉。您可喚醒裝置,並按任意功能鍵 繼續操作。 • 如想食物煮得更軟熟,請調至手動烹調模式,將食物煮更長的時間。跟從 「手動煮食模式」的步驟。 5 拔除本產品的插頭。 6 要將攪拌杯從摩打裝置移除 (圖 4 的步驟 9)。 • 可讓加熱元件更快地冷卻。 • 請小心,蓋和攪拌杯在烹調後可能會很熱。 • 請小心掀開蓋和提起量杯時的蒸汽釋放。 警告:煮食後請不要觸碰攪拌杯的底部和加熱元件。杯底和加熱元件 會非常熱! 7 從攪拌杯倒出煮好的配料/湯,避免過度煮食。 預設煮食 模式 亞洲湯水 濃湯 豆奶 粥 手動設定 預設烹調 時間 25 分鐘 25 分鐘 25 分鐘 30 分鐘 - 可調節的 煮食時間 15 – 35 分鐘 15 – 35 分鐘 15 – 35 分鐘 20 – 40 分鐘 30 秒 – 60 秒 可調節的 加熱等級 - - - - 低: 中: 高: 建議食譜 冬蔭功 南瓜湯 豆漿 八寶粥 低:保溫,烹調分量小的 配料,如醬料 中:在較高的溫度下燉煮 高:更快地煲食物 EN User manual MS Manual pengguna KO 사용 설명서 ZH-T 使用手冊 1 a b c d e f g h i j k l m n 3 3 1 2 1 2 5 4 4 4 1 2 3 5 7 8 9 10 6 Specifications are subject to change without notice © 2016 Koninklijke Philips N.V. All rights reserved. HR2091, HR2092, HR2098, HR2099, HR2199
Transcript of English · 2017-09-07 · 4240 002 00157 Bahasa Melayu 1 Gambaran keseluruhan (Rajah 1) Unit utama...
4240 002 00157
Bahasa Melayu
1 Gambaran keseluruhan (Rajah 1)Unit utama
aCawan penyukat dengan penunjuk paras air e Unit pisau
b Tudungf Elemen pemanasan
cBalang pengisar dengan kolar yang tidak boleh ditanggalkan.
d Gegelang kedap g Unit motor dengan panel kawalan
Panel kawalan
h Fungsi memasak i Tombol putar dan butang OK
Sup Asia j Butang denyut
Pureed soup (Sup puri) kTetapan penghancur ais dan tetapan kelajuan pengisaran
Susu kacang lTahap pemanasan dan butang pelarasan pemasa (-/+)
Bubur Paparan LED
Tetapan manual m Pemasa (MM:SS)
n Paras Pemanasan
한국어
1 개요(그림1)
본체
a 수위 표시기가 있는 계량컵 e 칼날부
b 뚜껑
f 열판
c 연결부가 고정된 블렌더 용기
d 봉합 링 g 제어판이 있는 본체
제어판
h 조리 기능 i 회전 조절기 및OK버튼
국 j 순간작동 버튼
스프 k얼음 분쇄 설정 및 블렌딩 속도 설정
두유 l온도 레벨 및 타이머 조절 버튼(-/+)
죽 LED디스플레이
수동 설정 m 타이머(분:초)
n 온도 레벨
繁體中文
1 概覽(圖 1)主裝置
a 量杯水位刻度 e 刀組
b 蓋子f 加熱元件
c 攪拌杯設有不可拆卸的圈
d 密封圈 g 有控制板面的摩打裝置
控制面板
h 烹調功能 i 旋鈕及確定按鈕
亞洲湯水 j 瞬間加速按鈕
濃湯 k 碎冰設定與攪拌速度設定
豆奶 l加熱等級和計時器調節按鈕 (-/+)
粥 LED 顯示屏
手動設定 m 計時器 (MM:SS)
n 加熱等級
English
1 Overview (Fig. 1)Main unit
aMeasuring cup with water level indicator e Blade unit
b Lidf Heating element
c Blender jar with non-detachable collar
d Seal ring g Motor unit with control panel
Control panel
h Cooking functions i Rotary knob and OK button
Asian soup j Pulse button
Pureed soup kIce crush setting and blending speed settings
Bean milk lHeating level and timer adjustment buttons (-/+)
Porridge LED display
Manual setting m Timer (MM:SS)
n Heating Level
English
Before first useThoroughly clean the parts that will come in contact with food before you use the appliance for the first time (see “Cleaning” in Fig. 9).
Bahasa Melayu
Sebelum penggunaan pertamaBersihkan bahagian yang akan bersentuhan dengan makanan secara menyeluruh sebelum anda menggunakan perkakas buat kali pertama (lihat "Pembersihan" dalam Rajah 9).
한국어
처음사용전제품을 처음 사용하기 전에 음식과 닿는 부품은 깨끗이 세척하십시오 (그림9 "세척" 참조).
繁體中文
首次使用前首次使用前,請先徹底清洗會與食物接觸的部件(請參閱圖 9 的「清潔」 章節)。
English
Pre-set cooking mode (Fig. 4)1 Follow the steps in “Preparing your cooking blender”.2 Turn the rotary knob to a pre-set function you need (step 3 in Fig. 4).
• To adjust the cooking time, press -/+ button. See table below for adjustable cooking time.
Tip: Keep -/+ button pressed to increase or decrease the time setting quickly.3 Press OK to start cooking.
» When cooking is completed, you will hear a few beeps.
4 Turn the rotary knob to “0” position after cooking.• The LED display will turn off if there is no operation in 5 minutes. You can wake
up the appliance and continue operating by pressing any function key.• If you want softer cooked food, switch to manual cooking mode to cook for
longer time. Follow the steps in “Manual cooking mode”.5 Unplug the appliance.6 Remove the blender jar from the motor unit (step 9 in Fig. 4).
• This allows the heating element to cool down faster. • Be aware that the lid and the blender jar will be hot after cooking.• Be aware of the steam release when you lift the lid and measuring cup.Warning: Do not touch the bottom of blender jar and the heating element after cooking. It is very hot!
7 Pour out the cooked ingredients/soup from the blender jar to avoid overcooking.
Pre-set cooking mode Asian
soupPureed soup
Bean milk Porridge Manual setting
Default cooking time
25 minutes
25 minutes
25 minutes
30 minutes -
Adjustable cooking time
15 – 35 minutes
15 – 35 minutes
15 – 35 minutes
20 – 40 minutes 30 seconds – 60 minutes
Adjustable heating level - - - -
LOW:
MED:
HIGH:
Suggested recipe
Tom Yum soup
Pumpkin soup
Soy bean milk
Eight treasures porridge
LOW: Keeping warm, cooking small amount of ingredients like saucesMED: Simmering at higher temperatureHIGH: Boiling food faster
Bahasa Melayu
Mod memasak pratetap (Rajah 4)1 Ikuti langkah-langkah dalam "Menyediakan pengisar memasak anda".2 Putar tombol putar kepada fungsi pratetap yang anda perlukan (langkah 3 dalam Rajah 4).
• Untuk melaraskan masa memasak, tekan butang -/+. Lihat jadual di bawah untuk masa memasak boleh laras.
Petua: Pastikan butang -/+ ditekan untuk menambah atau mengurangkan tetapan masa dengan cepat.
3 Tekan OK untuk mula memasak. » Apabila selesai memasak, anda akan mendengar beberapa bunyi bip.
4 Putar tombol putar kepada kedudukan "0" selepas memasak.• Paparan LED akan dimatikan jika tiada operasi dalam masa 5 minit. Anda boleh
menghidupkan perkakas dan meneruskan operasi dengan menekan sebarang kekunci fungsi.
• Jika anda mahu makanan menjadi lebih lembut, tukar kepada mod memasak manual untuk memasak makanan dengan lebih lama. Ikut langkah dalam “Mod memasak manual”.
5 Tanggalkan plag perkakas.6 Keluarkan balang pengisar daripada unit motor (langkah 9 dalam Rajah 4).
• Ini membolehkan elemen pemanasan menyejuk dengan lebih cepat. • Berhati-hati kerana penutup dan bilang pengisar akan menjadi panas selepas
memasak.• Berhati-hati dengan stim yang dikeluarkan apabila anda membuka penutup dan
cawan penyukat.Amaran: Jangan sentuh bahagian bawah balang pengisar dan elemen pemanasan selepas memasak. Ia sangat panas!
7 Tuangkan ramuan/sup yang dimasak daripada balang pengisar untuk mengelakkan daripada terlampau masak.
2
English
Preparing your cooking blender1 Assemble your cooking blender as suggested (Fig. 3).2 Check the quantity and settings for processing (Fig. 10).3 Open the lid and put the ingredients in the jar. 4 Insert the measuring cup and close the lid.5 Put the plug in the wall socket.
» The appliance is ready to use.Note: • To remove the blender jar from the motor unit, lift it off the motor unit.• It is normal that scratches occur on the heating element or the bottom surface of
the blade unit after use. This does not affect the performance or life of the appliance.
Bahasa Melayu
Menyediakan pengisar memasak anda1 Pasang pengisar memasak anda seperti yang dicadangkan (Rajah 3).2 Semak kuantiti dan tetapan untuk memproses (Rajah 10).3 Buka tudung dan letakkan bahan dalam balang. 4 Masukkan cawan penyukat dan tutup tudung.5 Pasangkan plag di soket dinding.
» Perkakas kini sedia untuk digunakan.Nota: • Untuk mengalih balang pengisar daripada unit motor, angkatnya keluar daripada
unit motor.• Calar pada plat pemanas atau permukaan bahagian bawah unit bilah selepas
penggunaan adalah perkara yang biasa. Ia tidak akan menjejaskan prestasi atau hayat perkakas.
한국어
조리블렌더준비1 제시된 대로 조리 블렌더를 조립하십시오(그림3).
2 재료의 양과 사용할 설정을 확인하십시오(그림10).
3 뚜껑을 열고 재료를 용기에 넣으십시오.
4 계량컵을 장착하고 뚜껑을 닫으십시오.
5 플러그를 벽면 콘센트에 꽂으십시오. » 제품을 사용할 준비가 되었습니다.
참고:• 본체에서 블렌더 칼날을 분리하려면 본체에서 빼냅니다.• 사용 후 열판이나 칼날부 바닥 표면에 긁힘이 발생하는 것은
정상입니다. 이러한 현상은 제품의 성능이나 수명에 영향을 미치지 않습니다.
繁體中文
準備烹飪攪拌機1 按照建議組裝您的烹飪攪拌機 (圖 3)。
2 檢查要處理的數量和設定 ( 圖 10)。
3 打開蓋子,把材料放入攪拌杯。 4 插好量杯,然後關上蓋子。
5 將插頭插入電源插座。 » 裝置已準備好使用。
注意: • 要將攪拌杯從摩打裝置移除,請將其從摩打裝置提起。• 加熱元件或刀片組件底面在使用後產生刮痕乃屬正常情況。這樣不會對
產品的效能帶來影響。
Mod memasak pratetap
Sup Asia Pureed soup (Sup puri)
Susu kacang Bubur Tetapan manual
Masa memasak lalai 25 minit 25 minit 25 minit 30 minit -
Masa memasak boleh laras
15 – 35 minit
15 – 35 minit
15 – 35 minit
20 – 40 minit 30 saat– 60 minit
Paras pemanasan boleh laras
- - - -
RENDAH:
SEDERHANA:
TINGGI:
Resipi cadangan
Sup tomyam Sup labu Susu kacang
soyaBubur lapan khazanah
RENDAH: Mengekalkan kepanasan, memasak bahan yang sedikit seperti sosSEDERHANA: Menggelegak pada suhu yang lebih tinggiTINGGI: Makanan mendidih dengan lebih cepat
한국어
사전설정조리모드(그림4)1 "조리 블렌더 준비" 단계를 따르십시오.
2 회전 조절기를 원하는 사전 설정 기능에 맞게 돌리십시오(3단계/그림4). • 조리 시간을 조절하려면-/+버튼을 누르십시오. 조절 가능한 조리
시간은 아래 표를 참조하십시오.
도움말: -/+버튼을계속 누르고 있으면 설정 시간을 빠르게 증가시키거나 감소시킬 수 있습니다.
3 OK를 눌러 조리를 시작하십시오. » 조리가 다 되면 몇 번의 신호음이 들립니다.
4 조리 후에는 회전 조절기를 "0" 위치로 돌리십시오.• 5분 동안 작동하지 않으면 LED 디스플레이가 꺼집니다. 아무 버튼이나
누르면 제품이 켜지고 계속 사용할 수 있습니다.• 부드러운 음식을 원하는 경우, 수동 조리 모드로 전환하여 더 오랫동안
조리하십시오. “수동 조리 모드”의 단계를 따르십시오.
5 제품의 전원 코드를 뽑으십시오.
6 블렌더 용기를 본체에서 분리하십시오(9단계/그림4). • 열판을 더욱 빠르게 식힐 수 있습니다. • 조리 후에는 뚜껑과 블렌더 용기가 뜨거울 수 있습니다.• 뚜껑과 계량 컵을 열 때 증기가 나올 수 있습니다.
경고:조리후에는블렌더용기바닥과열판을만지지마십시오.매우뜨겁습니다.
7 과도하게 조리되지 않도록 블렌더 용기에서 조리된 재료/수프를 따라내십시오.
사전설정조리모드 국 스프 두유 죽 수동 설정
기본조리시간
25분 25분 25분 30분 -
조절가능한조리시간
15 – 35분 15 – 35분 15 – 35분 20 – 40분 30초 – 60분
조절가능한온도레벨
- - - -
낮음:
중간:
높음:
권장레시피 톰얌쿵 호박 수프 두유 팔보죽
낮음: 보온, 소스와 같이 적은 양의 재료 조리
중간: 보다 높은 온도에서 은근히 끓이기
높음: 끓이기, 빠르게 조리
繁體中文
預設煮食模式(圖 4)1 遵從「準備烹飪攪拌機」的步驟。
2 轉動旋鈕至所需位置(圖 4 的步驟 3)。 • 要調整煮食時間,按下 -/+ 按鈕。請查看下表了解可調節的烹飪時間。
貼士: 保持按住 -/+ 按鈕快速增加或減少時間設定。
3 按「確定」開始煮食。 » 完成煮食後,你會聽到幾下嗶聲。
4 煮食後轉動旋鈕至「0」的位置。• 如果 5 分鐘沒有操作,LED 螢幕會關閉。您可喚醒裝置,並按任意功能鍵
繼續操作。• 如想食物煮得更軟熟,請調至手動烹調模式,將食物煮更長的時間。跟從
「手動煮食模式」的步驟。
5 拔除本產品的插頭。
6 要將攪拌杯從摩打裝置移除 (圖 4 的步驟 9)。 • 可讓加熱元件更快地冷卻。 • 請小心,蓋和攪拌杯在烹調後可能會很熱。• 請小心掀開蓋和提起量杯時的蒸汽釋放。警告:煮食後請不要觸碰攪拌杯的底部和加熱元件。杯底和加熱元件 會非常熱!
7 從攪拌杯倒出煮好的配料/湯,避免過度煮食。
預設煮食模式 亞洲湯水 濃湯 豆奶 粥 手動設定
預設烹調時間
25 分鐘 25 分鐘 25 分鐘 30 分鐘 -
可調節的煮食時間
15 – 35 分鐘
15 – 35 分鐘
15 – 35 分鐘
20 – 40 分鐘
30 秒 – 60 秒
可調節的加熱等級
- - - -低:
中:
高:
建議食譜 冬蔭功 南瓜湯 豆漿 八寶粥
低:保溫,烹調分量小的配料,如醬料
中:在較高的溫度下燉煮
高:更快地煲食物
EN User manualMS Manual pengguna
KO 사용설명서
ZH-T 使用手冊
1
a
b
c
d
e
f
g h i j k
lmn
3
3
12
1
2
5
4
4
4
1 2
3
5
7 8
9 10
6
Specifications are subject to change without notice© 2016 Koninklijke Philips N.V.All rights reserved.
HR2091, HR2092, HR2098, HR2099, HR2199
9
1 2
3 4
5
6
5
1 2
3 4
65
8
9 10
7
6
1
4
5
2
6
7 8
3
(30 sec. – 3 min.)
8
1 2
43
English
Manual cooking mode (Fig. 5)1 Follow the steps in “Preparing your cooking blender”.2 Turn the rotary knob to the manual mode (step 3 in Fig. 5).3 Adjust the heating level by pressing -/+ button and then press OK button to confirm.4 Adjust the cooking time by pressing -/+ button.5 Press OK button to start cooking.
» When cooking is completed, you will hear a few beeps. 6 Turn the rotary knob to “0” position.
• The LED display will turn off if there is no operation in 5 minutes. You can wake up the appliance and continue operating by pressing any function key.
7 Unplug the appliance.8 Remove the blender jar from the motor unit (step 11 in Fig. 5).
• This allows the heating element to cool down faster. • Be aware that the lid and the blender jar will be hot after cooking• Be aware of the steam release when you lift the lid and measuring cupWarning: Do not touch the bottom of blender jar and the heating element after cooking. It is very hot!
9 Pour out the cooked ingredients/soup from the blender jar to avoid overcooking.
Bahasa Melayu
Mod memasak manual (Rajah 5)1 Ikuti langkah-langkah dalam "Menyediakan pengisar memasak anda".2 Putar tombol putar kepada mod manual (langkah 3 dalam Rajah 5).3 Laraskan paras memanas dengan menekan butang -/+ dan kemudian tekan
butang OK untuk mengesahkan.4 Laraskan masa memasak dengan menekan butang -/+.5 Tekan butang OK untuk mula memasak.
» Apabila selesai memasak, anda akan mendengar beberapa bunyi bip. 6 Putar tombol putar kepada kedudukan “0”.
• Paparan LED akan dimatikan jika tiada operasi dalam masa 5 minit. Anda boleh menghidupkan perkakas dan meneruskan operasi dengan menekan sebarang kekunci fungsi.
7 Tanggalkan plag perkakas.8 Keluarkan balang pengisar daripada unit motor (langkah 11 dalam Rajah 5).
• Ini membolehkan elemen pemanasan menyejuk dengan lebih cepat. • Berhati-hati kerana penutup dan bilang pengisar akan menjadi panas
selepas memasak.• Berhati-hati dengan stim yang dikeluarkan apabila anda membuka penutup
dan cawan penyukat.Amaran: Jangan sentuh bahagian bawah balang pengisar dan elemen pemanasan selepas memasak. Ia sangat panas!
9 Tuangkan ramuan/sup yang dimasak daripada balang pengisar untuk mengelakkan daripada terlampau masak.
한국어
수동조리모드(그림5)1 "조리 블렌더 준비" 단계를 따르십시오.2 회전 조절기를 수동 모드 으로 돌리십시오(3단계/그림5).3 -/+버튼을 눌러 온도 레벨을 조절하고OK버튼을 눌러 확인하십시오.4 -/+버튼을 눌러 조리 시간을 조절하십시오.5 OK버튼을 눌러 조리를 시작하십시오.
» 조리가 다 되면 몇 번의 신호음이 들립니다.
6 조절기를 "0" 위치로 돌리십시오.• 5분 동안 작동하지 않으면 LED 디스플레이가 꺼집니다. 아무
버튼이나 누르면 제품이 켜지고 계속 사용할 수 있습니다.7 제품의 전원 코드를 뽑으십시오.8 블렌더 용기를 본체에서 분리하십시오(11단계/그림5).
• 열판을 더욱 빠르게 식힐 수 있습니다. • 조리 후에는 뚜껑과 블렌더 용기가 뜨거울 수 있습니다.• 뚜껑과 계량 컵을 열 때 증기가 나올 수 있습니다.
경고:조리후에는블렌더용기바닥과열판을만지지마십시오.매우뜨겁습니다.
9 과도하게 조리되지 않도록 블렌더 용기에서 조리된 재료/수프를 따라내십시오.
繁體中文
手動烹飪模式(圖 5)1 遵從「準備烹飪攪拌機」的步驟。2 將旋轉旋鈕至手動模式 (圖 5 的步驟 3)3 按住-/+ 調整加熱等級,然後按 OK 鍵確認。4 按住 -/+ 鍵調整煮食時間。5 按「確定」鍵開始煮食。
» 完成煮食後,你會聽到幾下嗶聲。 6 轉動旋鈕至「0」的位置。
• 如果 5 分鐘沒有操作,LED 螢幕會關閉。 您可喚醒裝置,並按任意功能鍵繼續操作。
7 拔除本產品的插頭。8 要將攪拌杯從摩打裝置移除 (圖 5 的步驟 11)
• 可讓加熱元件更快地冷卻。 • 請小心,蓋和攪拌杯在烹調後可能會很熱• 請小心掀開蓋和提起量杯時的釋放的蒸汽警告:煮食後請不要觸碰攪拌杯的底部和加熱元件。杯底和加熱元件會非常熱!
9 從攪拌杯倒出煮好的配料/湯,避免過度煮食。
English
Pulse (Fig. 8)1 Follow the steps in “Preparing your cooking blender”.2 Press and hold the Pulse button to start processing (step 3 in Fig. 8) until
getting the result desired. 3 Unplug the appliance.
Bahasa Melayu
Denyut (Raj. 8)1 Ikuti langkah-langkah dalam "Menyediakan pengisar memasak anda".2 Tekan dan tahan butang Denyut untuk memulakan pemprosesan
(langkah 3 dalam Raj. 8) sehingga mendapat hasil yang diinginkan.3 Tanggalkan plag perkakas.
한국어
순간작동(그림8)1 "조리 블렌더 준비" 단계를 따르십시오.
2 원하는 결과가 될 때까지 순간작동 버튼(3단계/그림 8)을 길게 누르십시오.
3 제품의 전원 코드를 뽑으십시오.
繁體中文
瞬間加速 (圖 8)1 遵從「準備烹飪攪拌機」的步驟。
2 按住瞬間加速按鈕開始調理 (步驟 3:圖 8) 直到獲得想要的成果。 3 拔除本產品的插頭。
EnglishIce crushing (Fig. 7)You can use the ice crushing program to crush ice. The program will stop automatically when all ice is crushed.1 Follow the steps in “Preparing your cooking blender”.2 Turn the rotary knob to the ice crushing setting.3 Press OK to start ice crushing.
» When processing is completed, you will hear a few beeps.4 Turn the rotary knob to “0” position after processing.
» The LED display will turn off if there is no operation in 5 minutes. You can wake up the appliance and continue operating by pressing any function key.
5 Unplug the appliance.
Bahasa MelayuPenghancur ais (Raj. 7)Anda boleh menggunakan program penghancur ais untuk menghancurkan ais. Program tersebut akan berhenti secara automatik apabila semua ais telah dihancurkan.1 Ikut langkah dalam “Menyediakan pengisar masakan anda”.2 Putarkan tombol putar kepada tetapan penghancur ais.3 Tekan OK untuk mula menghancurkan ais.
» Apabila selesai memproses, anda akan mendengar beberapa bunyi bip.4 Putarkan tombol putar kepada kedudukan “0” selepas pemprosesan selesai.
» Paparan LED akan dimatikan jika perkakas tidak beroperasi selama 5 minit. Anda boleh menghidupkan perkakas dan meneruskan operasi dengan menekan mana-mana kekunci fungsi.
5 Tanggalkan plag perkakas.
한국어
얼음 분쇄(그림 7)얼음 분쇄 프로그램을 사용하여 얼음을 분쇄할 수 있습니다. 얼음이 모두 분쇄되면 프로그램이 자동으로 멈춥니다.1 “조리 블렌더 준비” 단계를 따르십시오.2 회전 조절기를 얼음 분쇄 설정으로 맞춥니다.3 확인을 눌러 얼음 분쇄를 시작합니다.
» 작동이 완료되면 몇 번의 신호음이 들립니다.4 작동이 끝난 후 회전 조절기를 “0” 위치로 돌립니다.
» 5분 동안 작동하지 않으면 LED 디스플레이가 꺼집니다. 아무 버튼이나 누르면 제품이 켜지고 계속 사용할 수 있습니다.
5 제품의 전원 코드를 뽑으십시오.
繁體中文
碎冰 (圖 7)您可以使用碎冰模式打碎冰塊。該模式會在打碎所有冰塊後自動停止。1 依照「準備使用調理攪拌器」的步驟操作。2 將旋轉鈕轉到碎冰設定。3 按下 OK 開始碎冰。
» 調理完畢時,您會聽見幾聲嗶聲。4 調理完畢後,將旋轉鈕轉到「0」的位置。
» 如果 5 分鐘內沒有任何操作,LED 顯示幕將會關閉。按下任何功能鍵即可喚醒產品,繼續操作。
5 拔下產品電源插頭。
English
Cleaning (Fig. 9)1 Plug in the power cord. 2 Pour in non-abrasive cleaning detergent and warm soapy water (no more than
half of maximum capacity).3 Insert the measuring cup and the lid.4 Press Pulse button for 3 to 5 times.5 Keep the soapy water in the blender jar for 15 minutes.6 Unplug the appliance and then pour out to empty the blender jar.7 Rinse under tap to clean the blender jar.Note:• Do not use any metallic or sharp-edged utensils on the blade unit to avoid
scratching on the surface.• Do not use metal wool or brush to wash the blade unit to avoid scratching.• Use only soft cloth when cleaning the motor unit and blade unit.• Do not put the blade unit into the dishwasher. Tip:• Use soft cloth to clean the heating element after using. This can
ensure the best and consistent cooking performance.
Bahasa Melayu
Pembersihan (Raj. 9)1 Pasangkan kord kuasa. 2 Tuangkan detergen pencuci yang tidak melelas dan air sabun yang hangat
(tidak lebih daripada separuh kapasiti maksimum).3 Masukkan cawan penyukat dan penutup.4 Tekan butang Denyut/ sebanyak 3 hingga 5 kali.5 Biarkan air sabun dalam balang pengisar selama 15 minit.6 Cabut plag perkakas dan kemudian tuangkan untuk mengosongkan balang pengisar.7 Bilas di bawah paip untuk membersihkan balang pengisar.Nota:• Jangan gunakan sebarang alat logam atau bersisi tajam pada unit pisau untuk
mengelakkan calar pada permukaan.• Jangan gunakan bulu logam atau pemberus untuk mencuci unit pisau untuk
mengelakkan calar.• Gunakan kain lembut sahaja apabila membersihkan unit motor dan unit bilah.• Jangan letakkan unit bilah ke dalam mesin basuh pinggan.Petua: • Gunakan kain lembut untuk membersihkan elemen pemanas
selepas menggunakannya. Ini boleh memastikan prestasi memasak yang terbaik dan konsisten.
한국어
세척(그림9)1 전원 코드를 연결하십시오.
2 비마모성 세제와 따뜻한 비눗물을 부으십시오(최대 용량의 절반이 넘지 않도록).
3 계량컵과 뚜껑을 장착하십시오.
4 순간작동 버튼을 3회에서 5회 누르십시오.
5 블렌더 용기 안에 비눗물을 15분 동안 담아 두십시오.
6 제품의 전원 코드를 뽑고 블렌더 용기의 비눗물을 모두 따라내십시오.
7 블렌더 용기를 수돗물로 세척하십시오.
참고:• 표면의 손상을 방지하려면 금속 재질 또는 날카로운 주방 도구를
칼날부에 사용하지 마십시오.• 손상을 방지하려면 칼날부를 철제 수세미나 브러시로 씻지 마십시오.• 본체와 칼날부를 세척할 때는 부드러운 천만 사용하십시오.
• 칼날부를식기세척기에넣지마십시오.
도움말:
• 열판은사용후부드러운천을사용하여닦으십시오.이렇게하면계속해서맛있는음식을만들수있습니다.
繁體中文
清潔 (圖 9)1 插入電源線。 2 倒入非研磨性清潔劑和溫熱肥皂水(不超過最大容量的一半)。
3 插好量杯和蓋子。
4 按下瞬間加速按鈕 3 至 5 次。
5 讓肥皂水在攪拌杯內 15 分鐘。
6 拔除電源,然後清空攪拌杯。
7 在水龍頭下沖洗攪拌杯。
注意:• 不要使用任何任何金屬或鋒利的器具,避免劃傷表面。• 不要使用金屬羊毛或刷子刷洗刀片元件,避免劃傷。• 清潔摩打裝置和刀片元件時,只可使用軟布擦拭。
• 不要將刀片元件放入洗碗機。 貼士:
• 使用後用軟布清潔加熱元件。這樣可以確保裝置性能維持最佳,烹飪性能一致。
English
Blending (Fig. 6)1 Follow the steps in “Preparing your cooking blender”.2 When the LED display is blinking and showing 00:00, the appliance is ready to use.3 Turn the rotary knob to a speed setting (step 4 in Fig. 6).
» The blending process starts and the blending time will count up on the LED display.
Note: To avoid overheating, the appliance will turn off automatically after working for 3 minutes.• Or you can set the blending time by pressing -/+ button and then select
a speed setting. The adjustable time ranges from 30 seconds to 3 minutes. When the blending process starts, the blending time will count down on the LED display. The appliance will stop blending when the pre-set time is reached.
4 When blending is completed, you will hear a few beeps. 5 Turn the rotary knob to “0” position.
• The LED display will turn off if there is no operation in 5 minutes. You can wake up the appliance and continue operating by pressing any function key.
6 Unplug the appliance.Note:• Do not blend dry ingredients (for example pepper corn or star anise). It will
damage the coating and affect the cooking performance.
Bahasa Melayu
Mengisar (Rajah 6)1 Ikuti langkah-langkah dalam "Menyediakan pengisar memasak anda".2 Apabila paparan LED berkelip-kelip dan menunjukkan 00:00, perkakas sudah
sedia untuk digunakan.3 Putar tombol putar kepada tetapan kelajuan (langkah 4 dalam Rajah 6).
» Proses mengisar bermula dan masa mengisar akan dikira pada paparan LED. Nota: Untuk mengelakkan pemanasan yang melampau, perkakas akan dimatikan secara automatik selepas berfungsi selama 3 minit.• Atau anda boleh tetapkan masa mengisar dengan menekan butang -/+ dan
kemudian pilih tetapan kelajuan. Masa boleh laras berada dalam julat dari 30 saat hingga 3 minit. Apabila proses mengisar bermula, masa mengisar akan dikira pada paparan LED. Perkakas akan berhenti mengisar apabila masa yang dipratetapkan telah dicapai.
4 Apabila selesai mengisar, anda akan mendengar beberapa bunyi bip. 5 Putar tombol putar kepada kedudukan “0”.
• Paparan LED akan dimatikan jika tiada operasi dalam masa 5 minit. Anda boleh menghidupkan perkakas dan meneruskan operasi dengan menekan sebarang kekunci fungsi.
6 Tanggalkan plag perkakas.Nota:• Jangan kisar bahan kering (seperti biji lada dan bunga lawang). Ini akan
merosakkan salutan pengisar dan menjejaskan prestasi pemasakan.
한국어
블렌딩(그림 6)1 "조리 블렌더 준비" 단계를 따르십시오.
2 LED 디스플레이가 깜박이고 디스플레이에 00:00이 표시되면 제품을 사용할 준비가 된 것입니다.
3 회전 조절기를 속도 설정으로 돌리십시오(4단계/그림6). » 블렌딩 작업이 시작되고 블렌딩 진행 시간이 LED 디스플레이에
표시됩니다.
참고: 과열 방지를 위해 3분 간 작동한 다음 제품이 자동으로 꺼집니다.
• 또는 -/+버튼을 눌러 블렌딩 시간을 설정하고 속도 설정을 선택할 수 있습니다. 조절 가능한 시간 범위는 30초에서 최대 3분입니다. 블렌딩 작업이 시작되면 LED 디스플레이에 블렌딩 시간이 카운트 다운됩니다. 사전 설정된 시간에 도달하면 블렌더 작동이 중지됩니다.
4 블렌딩이 완료되면 몇 번의 신호음이 들립니다.
5 조절기를 “0” 위치로 돌리십시오.• 5분 동안 작동하지 않으면 LED 디스플레이가 꺼집니다. 아무
버튼이나 누르면 제품이 켜지고 계속 사용할 수 있습니다.
6 제품의 전원 코드를 뽑으십시오.
참고:• 마른 재료(예: 통후추 또는 팔각)를 갈지 마십시오. 코팅이 손상되어
조리 성능에 영향을 미칠 수 있습니다.
繁體中文
攪拌(圖 6)1 遵從「準備烹飪攪拌機」的步驟。
2 當 LCD 螢幕閃爍,並顯示 00:00,就代表裝置可以使用。
3 轉動旋鈕至速度設定 (圖 6 的步驟 4)。 » 混合過程開始,而攪拌時間將會在 LED 螢幕上漸增。
注意:為避免過熱,裝置運行 3 分鐘後,裝置會自動關閉。
• 或者可以按住 -/+ 按鈕然後選擇速度設定攪拌時間。可調校的時間範圍為 30 秒至 3 分鐘。當混合過程開始,攪拌時間將會在 LED 螢幕上倒數計時。達到預設時間時,裝置將會停止攪拌。
4 攪拌完成後,你會聽到幾下嗶聲。 5 轉動旋鈕至「0」的位置。
• 如果 5 分鐘沒有操作,LED 螢幕會關閉。您可喚醒裝置,並按任意功能鍵繼續操作。
6 拔除本產品的插頭。
注意:• 不要攪拌乾的食材(如胡椒或八角)。這樣會損壞塗層及影響煮食
性能。
7
1
4
5
2
6
7 8
3
(MAX)(MAX)
1500 ml
1500 ml
1500 ml
1200 ml
1500 ml
900 ml
1300 ml
12 x
4
4
4
4
1
1.5
1
1
-
25
25
30
2x2x2 cm
(min.)(min.)
10
EnglishIf the blade unit or the motor gets blocked, switch off the appliance and use a spatula to dislodge the ingredients that block the blade unit. It is recommended to reduce ingredient amount and cut very hard ingredients into smaller pieces before processing.
Bahasa MelayuJika unit bilah atau motor tersekat, matikan perkakas dan gunakan spatula untuk meleraikan bahan yang tersangkut pada unit bilah. Anda disyorkan agar mengurangkan jumlah bahan dan memotong bahan pejal menjadi bahagian kecil sebelum memprosesnya.
한국어
칼날부와 모터가 막힌 경우 제품의 전원을 끄고 주걱을 사용하여 칼날부에 낀 재료를 제거하십시오. 제품을 작동하기 전에 재료 양을 줄이고 딱딱한 재료를 작은 조각으로 자르는 것이 좋습니다.
繁體中文
如刀片組件或摩打被阻塞,請關閉裝置,使用刮鏟移除阻塞刀片組件的 材料。建議減少食材分量,及處理前將較硬的成分切得更小塊。


![G Dan aku mendengar semua makhluk yang di sorga dan yang ... filememiliki cawan-cawan emas mereka yang berharga bersama-sama dengan mereka malah ketika mereka menyembah Yeshua* [Yesus]](https://static.fdokumen.site/doc/165x107/5c93886309d3f2fb328cd77c/g-dan-aku-mendengar-semua-makhluk-yang-di-sorga-dan-yang-cawan-cawan-emas-mereka.jpg)


![Jualan barang kasut tudung.pptx [Read-Only]ewarga4.ukm.my/ewarga/pdf/2012/jan/09-25-1.pdf · KAIN TUDUNG BIL. Nama Barang Saiz 1. Kain Tudung Piping (Atenden) L& XL shj 2. 1. 2. 2.](https://static.fdokumen.site/doc/165x107/5e4d073210049d06de7d4174/jualan-barang-kasut-read-onlyewarga4ukmmyewargapdf2012jan09-25-1pdf.jpg)